
Fall is my favorite time of year. I think it’s the colors, the changing weather, and, of course, the cozy wardrobe I pull out of storage. There are just so many warm and wonderful fall vibes!
I wanted to create a fun fold card that captured all those autumn feelings while also giving you a sneak peek at some exciting new Stampin’ Up! products debuting in just a week. The Expanding Panel Step Card seemed like the perfect choice!
With three panels to decorate—or six if you decorate both sides—this fun fold card is incredibly versatile. And as the busy holiday season approaches, I love a card design that comes together fairly quickly but looks like you spent hours creating it. That’s a win in my book!
So, let me show you what I created.


A Fall-Inspired Expanding Panel Step Card
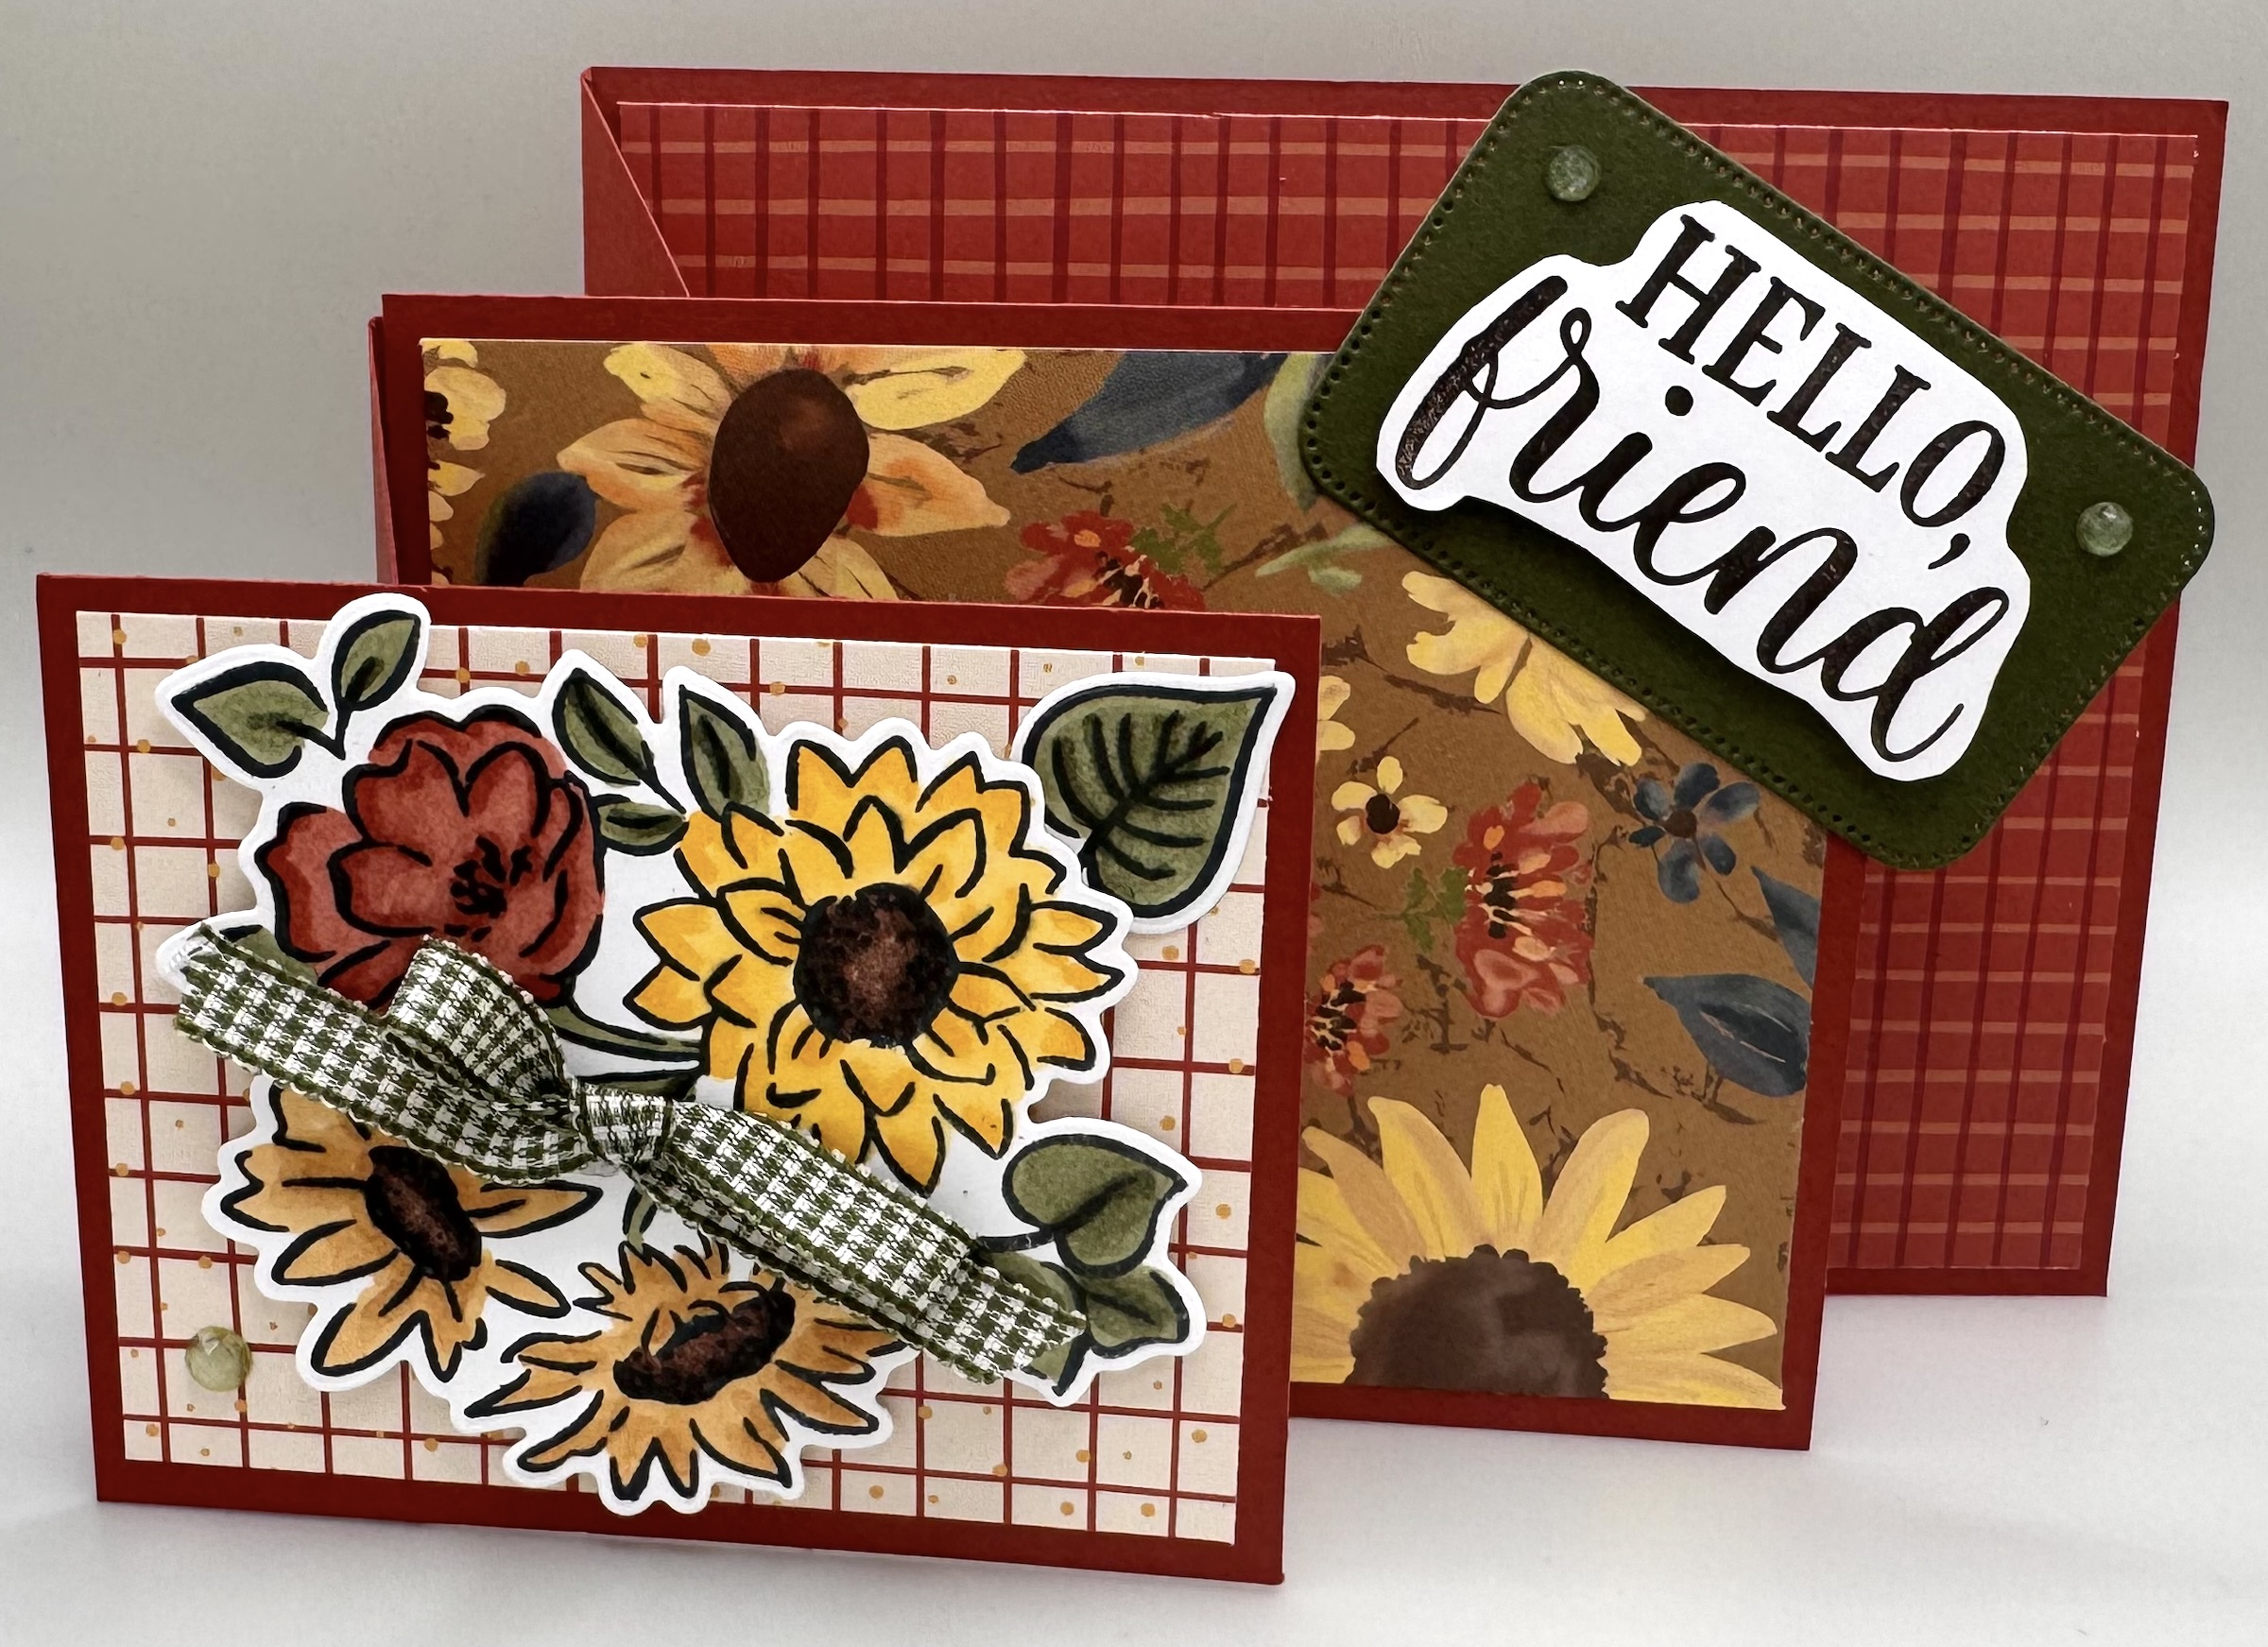
I love everything about this card! The Sunflower Fields Suite Collection, debuting in the September–December Catalog, is my absolute favorite suite in the new catalog.
First, the Designer Series Paper is simply stunning. The rich colors, beautiful flowers, and gorgeous background designs make this DSP perfect for both fall and summer projects. Of course, the sunflowers are a standout, but I love that the coordinating Radiant Sunflowers Bundle isn’t limited to Thanksgiving or fall cards. You can use these stamps and dies all year long! Simply change the colors you use to create completely different looks. Use bright spring colors for a cheerful floral card or rich autumn shades for a cozy fall project. That kind of versatility adds so much value to a crafting collection.
And speaking of colors, I find coloring these flowers incredibly relaxing. When I’m making a batch of cards, I love stamping all of my images onto a sheet of Basic White Cardstock and coloring them with my Stampin’ Blends while listening to my favorite playlist. It’s the perfect little bit of creative “me time.”
For this card, I used Cajun Craze for the card base and paired it with Mossy Meadow for my greeting. One of my favorite things about Stampin’ Up! Designer Series Paper is how easy it is to coordinate your colors. Just check the cardstock colors listed on the back of the DSP package!
I decorated the panels with some of my favorite patterns from the Designer Series Paper and added a Basic White panel to the back for my sentiment and a handwritten note. I always write a personal note inside my cards, so having that extra space is a must for me!
I decorated the front and inside of the card with bouquets of flowers and leaves from the coordinating stamp set and die cut them before arranging them onto the card.
For the greeting on the front, I die cut a rectangle using the Nested Essentials Dies and layered my fussy-cut greeting over the top. I also stamped the greeting in Mossy Meadow to coordinate with the rest of the card.
To finish it off, I added the gorgeous Mossy Meadow & Vanilla Gingham Ribbon and coordinating Radiant Gems from the suite.
And did you know the Sunflower Fields Suite also includes Radiant Foils Specialty Paper? I didn’t use it on this particular card, but I definitely will be soon! The shimmery foil details are absolutely beautiful.
Here’s what you need to know to create this card.
CUTTING/SCORING MEASUREMENTS
BASE: (Cajun Craze) 4 1/4″x9 1/2″, score at 5 1/2″, 6 1/2″, 7 1/2″ and 8 1/2″, then cut according to video or see the template below for guidance. (DSP) 4″x 5 1/4″; (Basic White) 2 1/2″x 3 1/2″
MIDDLE PANEL: (Cajun Craze) 3 1/2″x4 1/2″; (DSP) 3 1/4″x4 1/4″
FRONT PANEL: (Cajun Craze) 2 3/4″x3 1/2″; (DSP) 2 1/2″x3 1/4″
EXTRAS: (Mossy Meadow) rectangle shape from Nested Essentials Dies for greeting; Mossy Meadow & Vanilla Gingham Ribbon; Radiant Gems; Dimensionals

Here are my other samples!


A Congratulations Expanding Panel Step Card
I also created this pretty card for my niece’s girlfriend, who recently graduated from nursing school. She is one of the sweetest and most hardworking young women, and she has the prettiest smile. I really enjoy spending time with her, and I know she’ll love receiving this handmade congratulations card!
For this version, I used Pool Party for the card base and layered the vibrant Beautiful Ordinary Life Designer Series Paperon top. I love how versatile this DSP is, and I find myself reaching for it again and again for so many different card projects.
I used the Balloon Festoon Bundle to decorate the card. The balloons coordinate beautifully with the DSP, and I love that the stamp set includes several background images that add extra whimsy and personality to the balloons.
The greetings are another favorite feature. With sentiments that work for birthdays, congratulations, celebrations, and so many other occasions, this bundle gives you lots of creative possibilities.
For this card, I layered Designer Series Paper on both sides of the panels for an extra wow factor. And don’t forget—you can also die cut the balloons directly from your Designer Series Paper! Everything coordinates beautifully.
To finish the card, I added a few embellishments and gave the balloons a little extra sparkle with Clear Wink of Stella.


A Spooky Halloween Expanding Panel Step Card
I’ve also been working on Halloween cards for my grandchildren and siblings, and I had so much fun making this one for my youngest grandsons, who are just 1 and 2 years old!
For this Halloween version, I used Basic Black for the card base and decorated it with products from the Frightfully Fun Suite Collection.
I embossed the spiderwebs with Black Embossing Powder for extra texture and shine. Then I added lots of playful ghosts because I already know they’re going to be the favorite part of these cards!
The ghosts are stamped in black, but I added a little extra definition by outlining the stamped images with Smoky Slate Stampin’ Blends. I gave them rosy cheeks with Petal Pink Stampin’ Blends and colored over them with Clear Wink of Stella for a little bit of magical sparkle.
I also die cut a tree and some bats to help carry the Halloween design from the front of the card through to the back.
This card just makes me smile—and I made four of them!
Give the Expanding Panel Step Card a Try!
Have you made an Expanding Panel Step Card before?
I know this isn’t a brand-new fun fold. It’s been around the block a few times, but I believe some card designs are classics for a reason. Some fun folds are just too good not to keep in your permanent card-making rotation!
I love how the Expanding Panel Step Card gives you so much room to play with Designer Series Paper, stamped images, die cuts, embellishments, and different themes. You can make it seasonal, celebratory, floral, whimsical—or just about anything else you can imagine.
And because it looks more complicated than it actually is, it’s a great easy fun fold card to make when you want something special without spending hours on one card.
I hope you’ll give this fun fold card a try. Pull out your favorite Designer Series Paper, choose a coordinating color combination, and see what you can create!
Happy Crafting!
Jill