
If summer temperatures have you dreaming of cooler days, it’s the perfect time to pull out your fall crafting supplies! In today’s tutorial, I’m sharing how to create a stunning Slimline Pop Up Card using the adorable Frightfully Fun Suitefrom Stampin’ Up! This interactive fun fold is packed with surprises and is guaranteed to wow anyone who opens it.
The whimsical ghosts, playful bats, and colorful Designer Series Paper make this Halloween version absolutely irresistible. The best part? This fun fold isn’t limited to Halloween! Change the papers, stamps, and colors, and you’ll have a beautiful card for birthdays, Christmas, thank you cards, weddings, or just because.


Halloween Slimline Pop Up Card
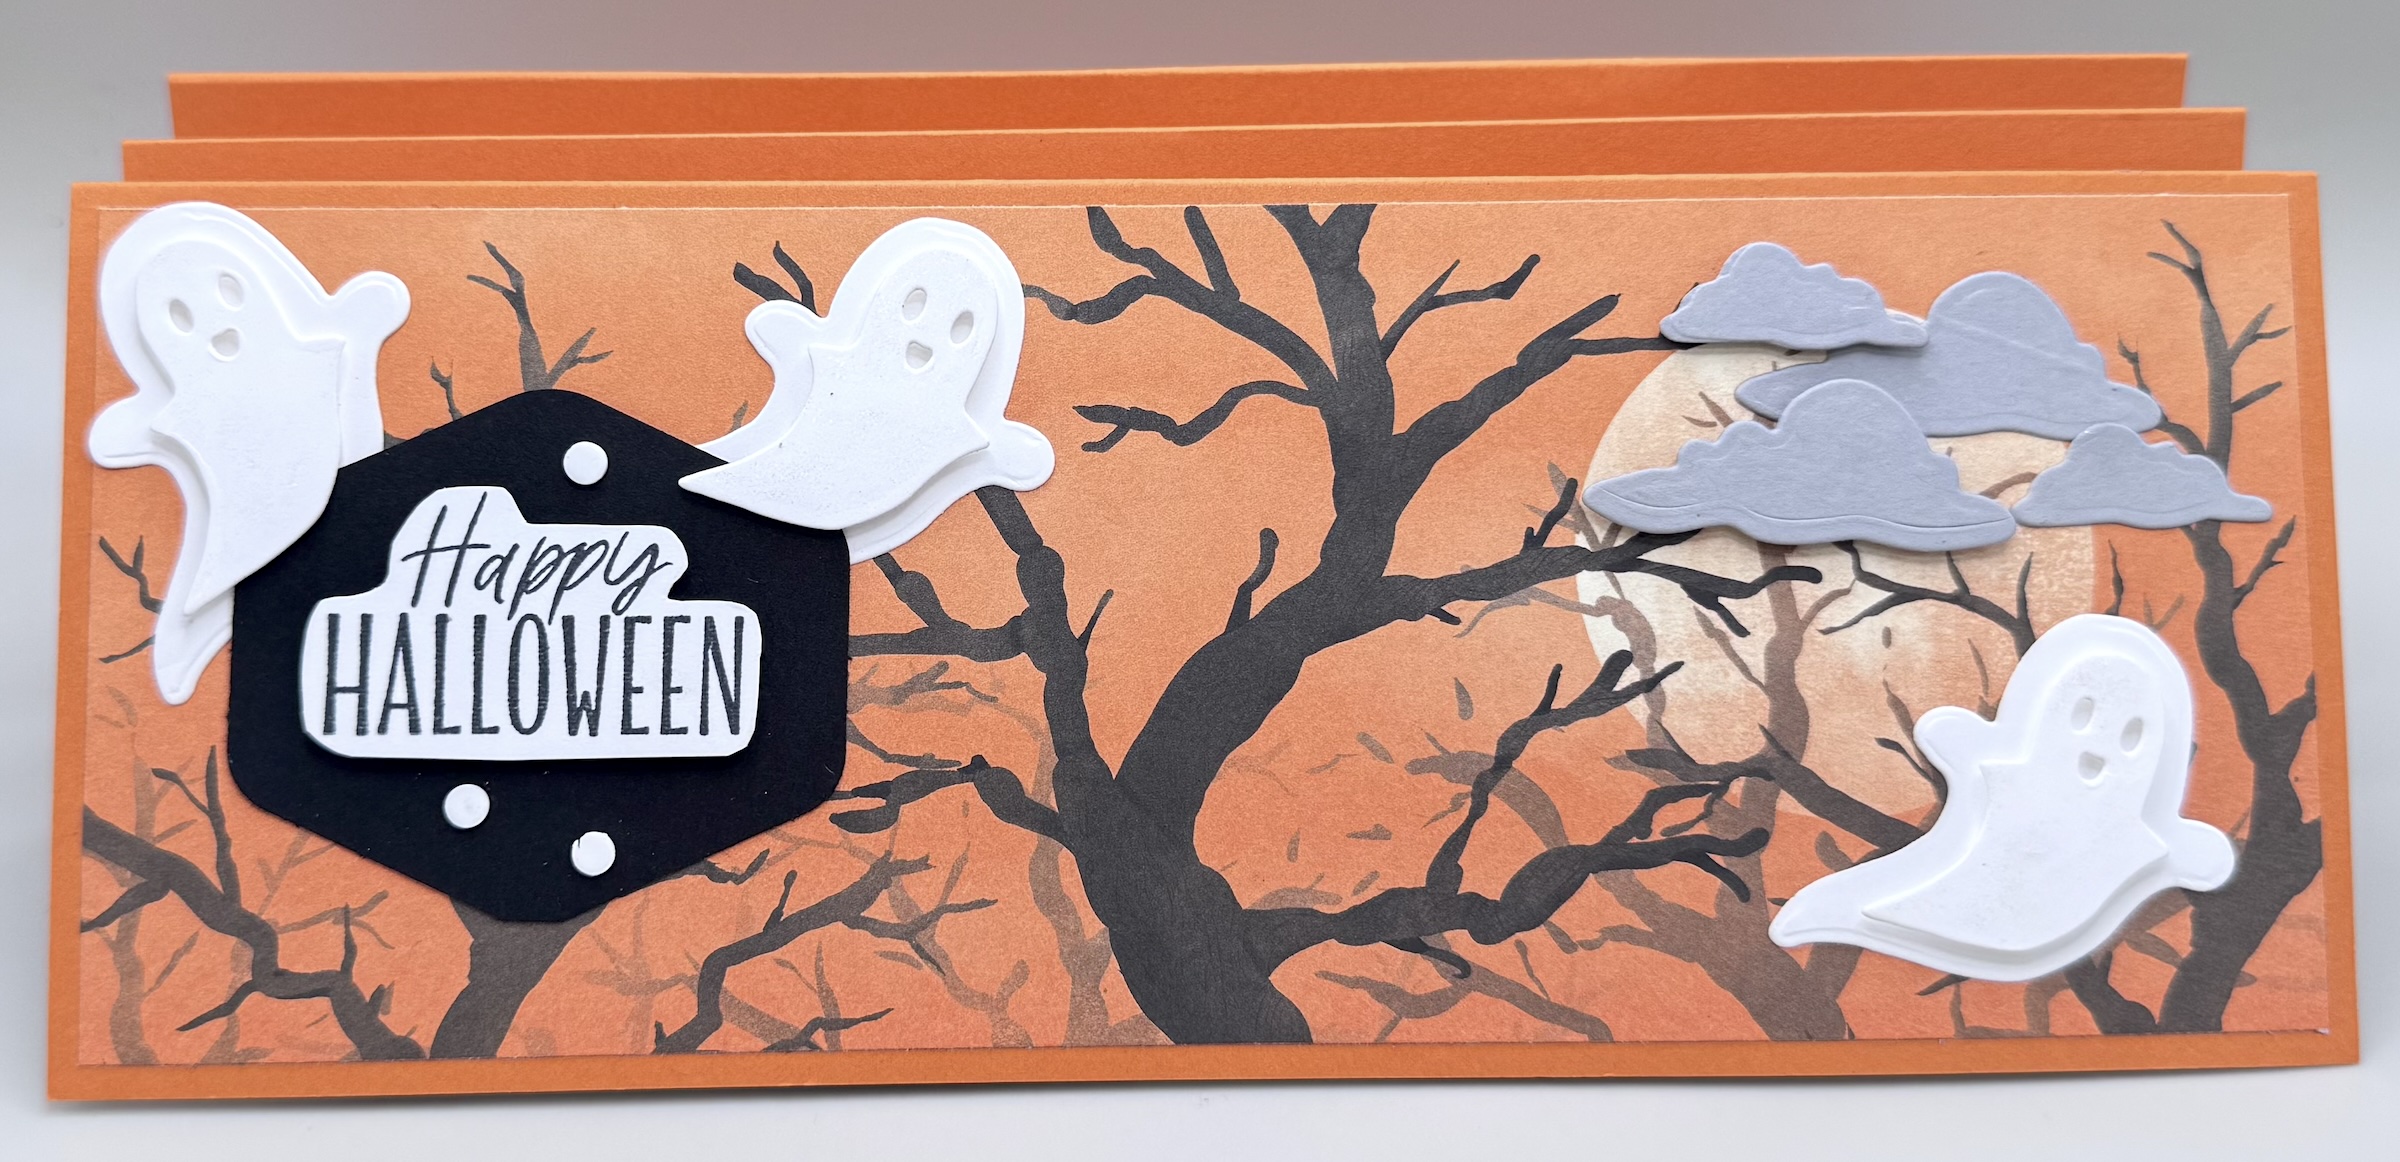
For my first card, I started with a Pumpkin Pie card base layered with Basic Black and the gorgeous Frightfully Fun Designer Series Paper. The patterned paper does most of the decorating, making this card surprisingly easy to assemble.
I like to decorate the pop-up panels with ten pieces of one Designer Series Paper pattern and two coordinating accent pieces for extra visual interest. One pop-up panel features a colony of flying bats, while the other showcases a cheerful “BOO to You!” greeting.
To finish the inside, I added small coordinating cardstock rectangles to the center sections, giving every angle a polished look. A touch of Clear Wink of Stella adds magical sparkle to the bats, while layered die-cut bats on the front create wonderful dimension.
Here’s what you need to know to recreate this fun fold.
CUTTING/SCORING MEASUREMENTS
BASE: (Pumpkin Pie) 8 1/2″x10 3/4″, score at 3 3/8″, 4 3/8″, 5 3/8″, 6 3/8″ & 7 3/8″
FRONT: (DSP) 3 1/8″x8 1/4″ **or you do a cardstock layer at 3 1/8″x8 1/4″ and then DSP 2 7/8″x8″
INSIDE: 3 1/8″x8 1/4″ x2 – 1 cardstock and 1 DSP; (Basic White) 2 7/8″x8″
POP UP SECTION: (Pumpkin Pie) 2 1/8″x6″, score at 3″ (x4). **tip – cut an 8 1/2″x 6 piece of cardstock, with the 6″ side at the top, score at 3″ and then with the 8 1/2″ side at the top, cut the 4 pieces at 2 1/8″ wide and it works out perfectly.
DSP for POP UPS: 1 7/8″x2 3/4″ (x12) **2 of one design and 10 of another design
SMALL PIECES FOR CENTER PANEL: (Basic Black) 1 7/8″x3 /4″ (x4)


Boardwalk Birthday Version
This next version couldn’t be more different—and that’s exactly why I love this fun fold!
Using Timid Tiger, Pool Party, the cheerful Beach Boardwalk Designer Series Paper, and the Balloon Festoon Bundle, I created a bright birthday card full of seaside charm. The coordinating balloon images blend beautifully with the Designer Series Paper, making decorating quick and easy.
The greeting on the front was created with the Nested Essentials Dies, while the inside pop-up panels include stamped balloons and playful details. I even added strings to the balloons so they wouldn’t “float away!”
I recently gave this card to my daughter for her birthday, and she absolutely loved it. It now has a place of honor displayed in her kitchen!


Portrait Slimline Pop Up Card
One of my favorite things about this fun fold is its versatility. Turn the card upright, and you have an entirely different look!
For this elegant version, I used the beautiful Bloom Boutique Specialty Designer Series Paper with a Crisp Cantaloupe card base layered with Peaceful Pine. The gorgeous greenery on the front was created using the Botanical Expressions Die. Simply cut a cardstock strip to your desired width, center the die, and you’ll have perfectly even borders on each side. I combined two die-cut pieces to fit the slimline card and even used the leftover die-cut on the inside.
The greeting was created with the Stylish Shapes Dies, then accented with the stunning Gold Wing Accents. Since the Designer Series Paper already includes gold foil details, everything coordinates beautifully for an elegant finished card.
A Fun Fold That Impresses Every Time
This Slimline Pop Up Card is one of those projects that never fails to impress. Every time you open another layer, there’s something new to discover! Whether you choose a playful Halloween theme, a cheerful birthday design, or an elegant floral version, this interactive fun fold is sure to become a favorite.
So…which version is your favorite? Do you prefer the landscape design or the portrait orientation? I’d love to hear in the comments!
Happy Crafting!
6 responses to “How to Make a Slimline Pop Up Card | An Easy Fun Fold Card Tutorial”
•
This is absolutely wonderful. Thank you so much for sharing!
•
Thanks Beth. I’m so glad you like this one!
•
Thank you for sharing this great card!! I am obsessed and making so many of them. So fun with different dsp!
•
Thanks Lorilee. And, thanks for watching my videos!
•
You are brilliant at all techniques and creativity. Good Show on all! Thank you for sharing. (Do you make the slimline envelope yourself or do you buy them somewhere?)
•
Thank you for your kind words! I just keep regular letter size envelopes on hand for my slimline cards. They do double duty for when we need to send letters or paperwork, too! Nothing special.