
It’s nearly October, and I usually feel like once October hits, everything starts speeding up until January! One thing I like to get a head start on is my Christmas card crafting.
I send a LOT of cards—to family and friends, customers, fellow paper crafters, and friends I’ve made along the road while RVing. On top of that, I sell handmade cards in a market shop my friend owns, so I have to keep her well stocked, too.
It’s a lot, but it’s certainly a labor of love. I never get tired of making cards!
Today I’m sharing the Double Door Pop Up Card, and I think you’re going to love this fun fold. Not only is it adorable for holiday cards, but the design can be used all year long. Once you learn how to make this fun fold, you’ll find yourself reaching for it again and again.


A Christmas Card with a Fun Fold Twist
Have you seen the Christmas Crew Bundle in the new catalog? Oh my goodness—these little woodland buddies are the best! You can’t help but smile back at those adorable faces.
The Christmas Crew Bundle makes the cutest Christmas cards, but don’t let the holiday theme limit your creativity. I can easily see the bear and moose being used for birthday or thank-you cards. Just change what you stamp on the sign!
I’m all about getting as many occasions as possible out of my stamps and dies.
The same goes for this Double Door Pop Up Card. This fun fold works beautifully for whimsical, elegant, seasonal, or everyday cards. It’s also a fantastic design for showing off Designer Series Paper, embossed backgrounds, stamped images, and other favorite cardmaking techniques.
In other words, you can really make this fun fold your own!
A Festive Christmas Double Door Card
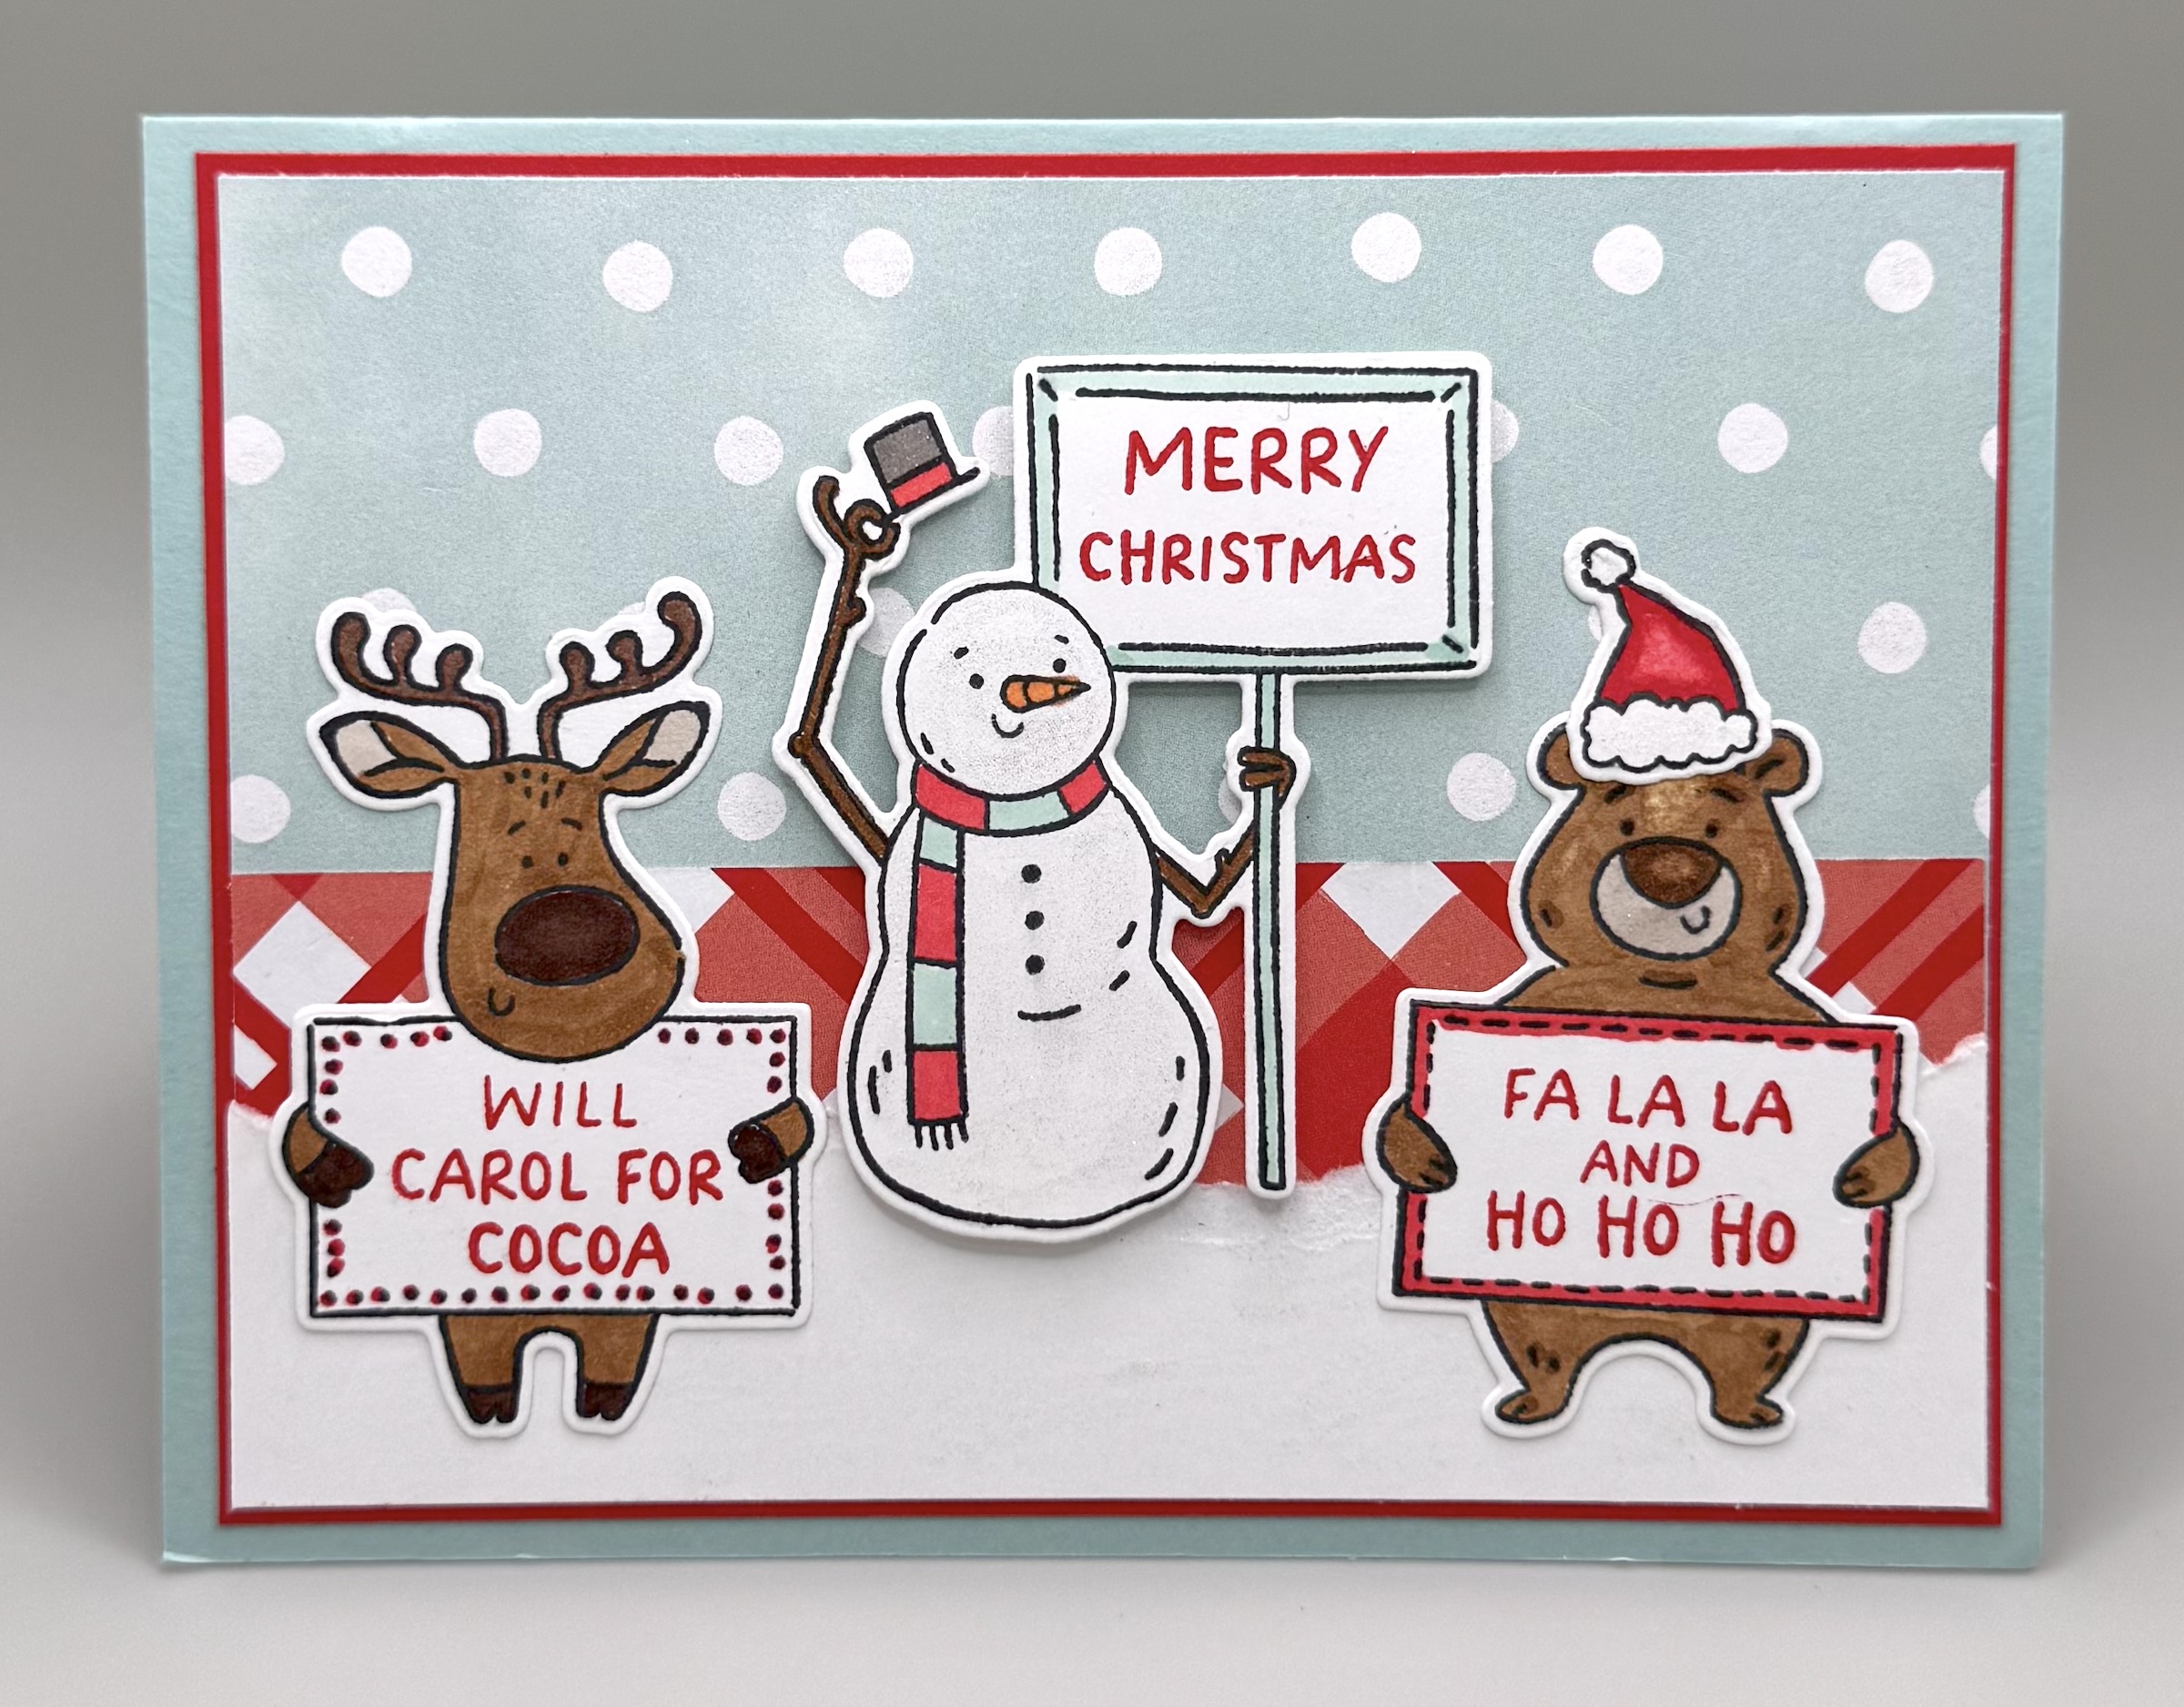
For my Christmas version, I used Pool Party for the card base and paired it with Poppy Parade. I chose Poppy Parade to coordinate with the plaid Designer Series Paper from the Timeless Christmas collection.
I absolutely love Pool Party and Poppy Parade together!
I also pulled a polka-dot pattern from the Beautiful Ordinary Life Designer Series Paper to create what looks like a snowy background. This is one of my favorite tips when working with Designer Series Paper: don’t necessarily look at a pattern for what it was designed to be. Look at the individual elements and think about how else you can use them.
You might be surprised by the combinations you can create!
For the front of the card, I layered the polka-dot paper with some of the plaid DSP. Then I tore a strip of Basic White cardstock to create a snowy bank for my woodland friends to gather on.
I colored the adorable images with Stampin’ Blends, die cut them, and layered them onto the front of the card. I used Dimensionals behind the snowman to give him the spotlight.
And because a snowman deserves a little sparkle, I added Clear Wink of Stella to make his snowy self shimmer.
Here’s a fun little tip: You can also color in the polka dots on the Designer Series Paper with Clear Wink of Stella to create a glittery snow background.
It’s such a simple way to add a little extra holiday sparkle!
A Surprise Inside the Double Doors
For the inside of the card, I stamped an extra bear and colored only the portion from his shoulders up. I trimmed away the rest so he could peek out from behind the die-cut trees.
And, of course, I couldn’t resist adding a little more whimsy. There’s a Santa hat in the die set, so I cut a couple of Santa hats and added them to my bear.
The plaid Designer Series Paper decorates the double doors. When you open the card, the doors swing open to reveal the sentiment and our adorable little bear friend. How fun is that?!
Turn the Christmas Crew Into Gift Tags and Ornaments
The Christmas Crew images would also make adorable Christmas gift tags and ornaments.
Here’s an easy way to create them:
1. Color and die cut your images.
2. Add Dimensionals to the back.
3. Die cut an additional layer from Basic White cardstock.
4. Attach the Basic White layer to the back of your image.
5. Add a little ribbon or twine between the layers so you can hang it on a gift or Christmas tree.
The extra Basic White layer serves two purposes. It covers any Stampin’ Blends bleed-through and gives you a clean space on the back for writing a name or message.
I love when one bundle gives me so many possibilities!
Here’s what you need to know to create this Double Door Pop Up Card.
CUTTING/SCORING INSTRUCTIONS
BASE: (Pool Party) 5 1/2″x8 1/2″, scored at 4 1/4″
FRONT LAYERS: (Poppy Parade) 5 1/4″x4″; (Polka Dot DSP) 5 1/8″x3″; (Plaid DSP) 5 1/8″x1 1/2″ or so; (Basic White) 5 1/8″ wide and then tear to the height you want to create a snowbank.
INSIDE DOOR MECHANISM: (Pool Party) 1 1/2″x5″ (x2) ; with 1 1/2″ at the top, score in half at 3/4″. Then, with 5″ at the top, mark a line at 1 1/2″; then score an “X” from line to corners. *See Video
DOORS: 2″x3 1/2″ (x2); (DSP) 1 3/4″x3 1/4″
DECORATIVE SIDE STRIPS: (DSP) 1/2″x4″ (x2)
INSIDE: (Poppy Parade) 3 3/4″x4″; (Basic White) 3 5/8″x3 7/8″
EXTRAS: Clear Wink of Stella, Dimensionals, Stampin’ Blends


Double Door Pop Up Card #2: Sweet and Floral
My second sample is completely different from the Christmas card. I wanted to show you just how versatile this Double Door Pop Up Card fun fold can be.
For this card, I went with a soft, flowery, feminine vibe using the Thinking of You Bundle and beautiful Velvet Meadow Designer Series Paper.
I die cut the Thinking of You sentiment from Perfectly Pine to coordinate with my card base. Then I die cut the Thinking of You background from pink Velveteen Assortment Specialty Paper.
I absolutely love the velvet texture in both of these papers!
I layered the Designer Series Paper onto Bubble Bath cardstock, which really makes the pattern pop against the Perfectly Pine card base.
I accidentally stamped the flower inside in Perfectly Pink instead of Bubble Bath—but you know what? It still works! Sometimes the happy accidents are the best part of creating.
This card was super simple to put together with minimal stamping and coloring. That makes this fun fold a great choice when you want to create a quick bundle of handmade cards to have on hand for birthdays, thank-you notes, thinking-of-you cards, and other occasions.


Double Door Pop Up Card #3: Sunflower Fields
For my third sample, I used one of my favorites—the Sunflower Fields Suite.
And let me just say, this suite isn’t only for Fall!
It makes beautiful cards for so many occasions. You can change the colors of the flowers to pinks, blues, purples, or whatever colors inspire you and completely change the look of the card.
And those flowers don’t have to be sunflowers. They can be whatever you want them to be!
For this card, I started with a Pecan Pie card base and paired it with the beautiful Sunflower Fields and Radiant Foils Designer Series Paper.
The Radiant Foils Specialty Paper adds just the right amount of shine and coordinates beautifully with the dotted DSP. I joined the two papers together with a bit of Pecan Pie ribbon from my stash.
For the floral arrangement, I stamped, colored, and die cut two floral sprays and one sunflower. Then I arranged them on the front of the card, using Dimensionals to raise the sunflower and add some dimension.
I also embossed my greeting onto the tag die included in the dies and popped that up on the front with a few more Dimensionals.
A few coordinating embellishments from the suite finished everything off perfectly.
I also carried the shine through to the inside of the card to make the double doors just as pretty when they’re opened.
And here’s another little crafting confession: I had a leftover sunflower sitting on my desk for two weeks! So, rather than let it continue taking up valuable desk real estate, I die cut a flower pot, “planted” my sunflower, and added it to the inside of the card along with my sentiment.
I think a set of these cards would make a wonderful handmade gift for a friend!
So Many Possibilities with One Fun Fold
I really enjoyed making all three of these Double Door Pop Up Cards, and I hope they’ve given you some ideas for your own creations.
That’s one of my favorite things about fun fold cards. Once you learn the basic construction, the possibilities are endless. Change the Designer Series Paper, colors, stamp set, embellishments, or occasion, and you have an entirely new card.
So, what do you have in your crafting stash that would make a great Double Door Pop Up Card?
I bet you can create something wonderful!
I hope you enjoy making this fun fold as much as I did. And don’t forget to set aside a little time this week to tap into that amazing creativity you have inside of you.
It’s good for the soul! ❤️
Happy Crafting!
Jill
Leave a Reply