
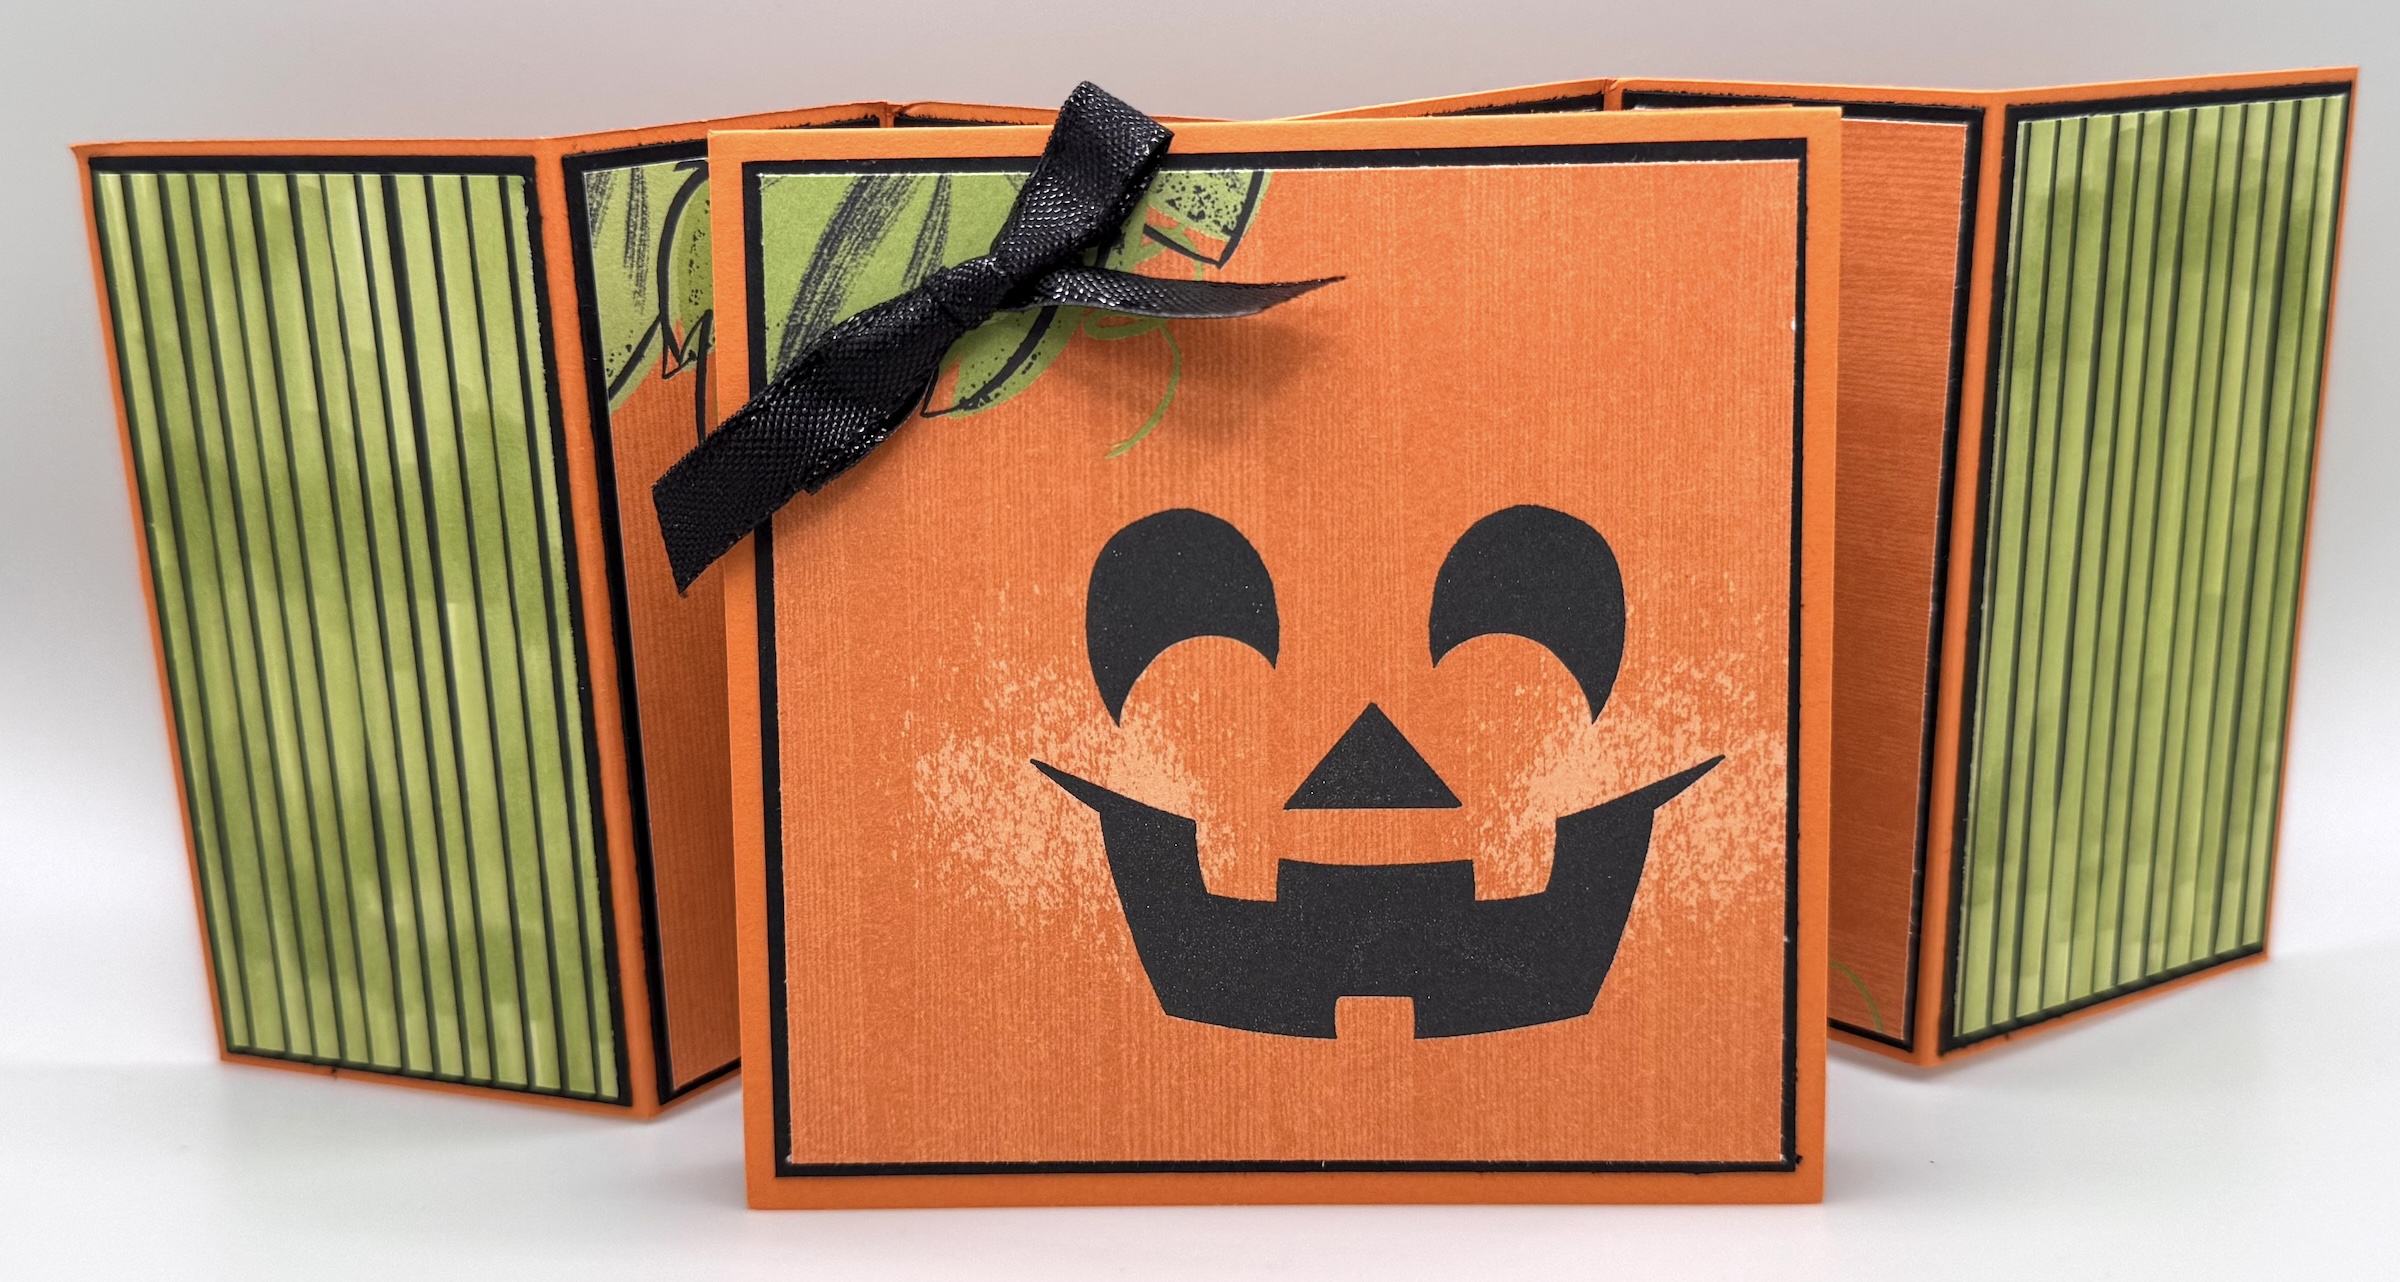
There are some fun fold cards that completely amaze me because someone brilliantly manipulated a piece of paper and created something extraordinary. This Flying Fun Fold Card is definitely one of those designs!
This clever card design was created by the incredibly talented Susan Campfield. I’m always in awe of her creations. I love her clean aesthetic, beautiful color palettes, and the way she approaches paper crafting. She is truly a paper-engineering guru, and I think we owe her a big round of applause for adding so much joy and inspiration to the world of fun fold card making!


II’m still working on my Halloween cards, so I’ll have plenty to send to friends and family—especially the grandkids, who absolutely love getting handmade cards. And, of course, they love them even more when they come with a little sweet treat!
I made this particular card for my granddaughter, Jane. The little bow on the pumpkin reminded me of her adorable little ponytail. She’s 10 months old and just as cute as can be—just like this little pumpkin! After making the card, I decided I had to share the how-to tutorial with all of my online crafty friends.
Flying Fun Fold Halloween Card
My card base is Pumpkin Pie cardstock, and I used the Spooktacular 6” x 6” Designer Series Paper to decorate the card.
You might be wondering about that green striped paper because there isn’t any green striped paper in the pack. Well, I really, really wanted some green, so I simply colored the white stripes with my Granny Apple Green Stampin’ Blends!
That little bit of green was just what I needed to pull in the green leaves on the pumpkin.
Don’t forget that you can customize your Designer Series Paper! Try using your Stampin’ Blends, ink, watercolors, or chalks on your DSP. This is especially fun with black-and-white or neutral patterns. You can completely change the look and feel of a piece of Designer Series Paper simply by adding your own color choices.
Make Your Flying Fun Fold Your Way
I like to write a personal message in all of my cards, so I like having plenty of space to do it. I adjusted the original design to create a panel on the front that opens, giving me lots of room to write while still allowing the card to stand nicely.
If you’d rather keep things simple, I’ll also include measurements in the tutorial for creating the card with just a panel on the front and an area on the back for your message.
It’s your card, so design it your way! 😊
Have you seen the Soiree Salutations stamp set in the new catalog? Let me tell you, this simple stamp set has something for just about every occasion. It’s one of those stamp sets that will get used over and over throughout the year, and it works beautifully with the Three Banner Punch.
For this Halloween card, I simply stamped “Trick or Treat” repeatedly in Smoky Slate to create a subtle background. Because the color is light, it’s still easy to write over it when I sign my card.
CUTTING/SCORING INSTRUCTIONS
BASE: (Pumpkin Pie) 4 1/4″x8 1/4″ (x2); score each at 2 1/4″, 4″ and 6 1/4″ **fold from left to right as mountain/valley/valley) Refer to video for assembly.
BASE PANELS: (Basic Black) 2 1/8″x 4 1/8″ (x2); (DSP) 2″x4″ (x2); (Basic Black) 1 5/8″x4 1/8″ (x2); (DSP) 1 1/2″x4″ (x2); (Basic Black) 2 1/8″x4 1/8″ (x2); (DSP) 2″x4″ (x2)
FRONT: For card style – (Pumpkin Pie) 4 1/4″x8 1/2″, score at 4 1/4″; (Basic Black) 4″x4″; (DSP) 3 7/8″x3 7/8″; For panel style – (Pumpkin Pie) 4 1/4″x4 1/4″; (Basic Black) 4″x4″; (DSP) 3 7/8″x3 7/8″; then add panels to the back to write on – (Basic White) 2″x4″ (x2)
EXTRAS: Black Ribbon; Clear Wink of Stella


Flying Fun Fold Sunflower Card
Of course, I couldn’t stop with just one card! I wanted to see how this Flying Fun Fold card design would look with completely different colors and products.
I love creating with the Sunflower 3D Embossing Folder, and it pairs beautifully with the Designer Series Paper in the Sunflower Fields Suite.
For this card, I used a Daffodil Delight card base layered with Mossy Meadow. I used several different DSP patterns on the various panels, and then I created my own coordinating background on the inside layer by stamping sunflowers in Mossy Meadow for a beautiful tone-on-tone effect.
Adding Color to the Embossed Panel
For the front panel, I wanted to add a little more artistic interest to the embossed design.
I started by swiping my Pecan Pie Stampin’ Pad directly across my embossing folder—the side with the Stampin’ Up! logo. Then I added my Basic White cardstock and ran it through my Stampin’ Emboss Machine.
Once the panel was embossed and inked, it was time to color!
I used Daffodil Delight, Mossy Meadow, and Pecan Pie Stampin’ Blends to color in the flowers and greenery. I absolutely love how this turned out.
You could also use Sponge Daubers or Blending Brushes to add color for a softer, more artistic look.
Since I created this version with just a panel on the front, I added two panels to the back for writing my message and signing the card. I stamped my sentiment and added one more sunflower to pull the whole design together.
I finished it off with some retired ribbon from my stash, popped the greeting up with Stampin’ Dimensionals, and, of course, added a few embellishments for a little sparkle!


Flying Fun Fold Christmas Card
And now for my favorite!
I’m such a sucker for a snowman. I don’t know if it’s because I grew up a Florida girl and snowmen were just a fantasy, or if it’s simply because they’re so darn cute!
When I saw the Christmas Crew Bundle in the new catalog, I knew I had to have it because—well, that snowman! ❤️
I wanted this card to be something other than the traditional red and green Christmas color combination, so I planned my color palette around the Whispering Woods Designer Series Paper.
I love the combination of blues and greens with that little hint of brown. And since the crew in this stamp set includes all sorts of adorable woodsy creatures, it works perfectly!
My card base is Pretty Peacock, layered with Secret Sea. I used a beautiful woodsy scene from the DSP for the front of the card and then added my whimsical little snowman, popping him up with Stampin’ Dimensionals.
I colored his scarf with Pretty Peacock and Lost Lagoon Stampin’ Blends to coordinate with the rest of the card.
And if you want to add a little extra magic to your snowman, simply brush on some Clear Wink of Stella. ✨
Let It Snow!
I also created my own snowy background by dotting little spots of liquid glue all over the sky and then sprinkling it with some retired Dazzling Diamonds glitter.
Yes, I’ve hoarded it for a very long time! 😂
I really wish Stampin’ Up! would bring that glitter back, but no worries if you don’t have any. Any glitter will work, or you could use small shimmery embellishments for a similar effect.
I finished the inside of the card with a few trees die-cut from the coordinating dies. This is such a pretty card, and I know I’ll be making many more to give to friends and family.
Which One Is Your Favorite?
Isn’t the Flying Fun Fold Card such a great design?
I love that one basic card fold can look completely different depending on the Designer Series Paper, colors, embossing folders, and stamps you choose. You can make it spooky for Halloween, bright and cheerful with sunflowers, or cozy and magical for Christmas.
And the best part? Anyone who receives one of these cards is sure to be impressed with your crafty skills—and completely flattered that you took the time to make them such a unique handmade card.
So, what do you think of the Flying Fun Fold?
Which of these three cards is your favorite?
I’d love to know what you think, so leave me a comment and let me know!
Happy Crafting!
Jill
Leave a Reply